
Who this is for: anyone who needs the Toggl button on a website to record more than just a title — a project, tags, a customer name. No coding background assumed.
If you only need a button on a page that doesn't have one yet, start with Create a Toggl Browser Integration (with Claude) instead. This page picks up where that one stops: deciding what the button records.
The rest of this guide
- Mapping recipes — every construct the format supports, with a snippet and what it produces. Start here once you know what you want to map.
- Worked examples — three complete mappings for Jira, GitHub and Zendesk, ready to copy.
- Button placement and behaviour — where the button goes, when it appears, and how it behaves. The other half of a definition.
What a custom integration actually does
An integration is a single JSON document that teaches the extension two things about a website:
- Where to put the Toggl button on the page.
- What to read off the page when someone clicks it.
That second part is what this page is about. A well-mapped integration turns one click into a complete, correctly filed time entry:
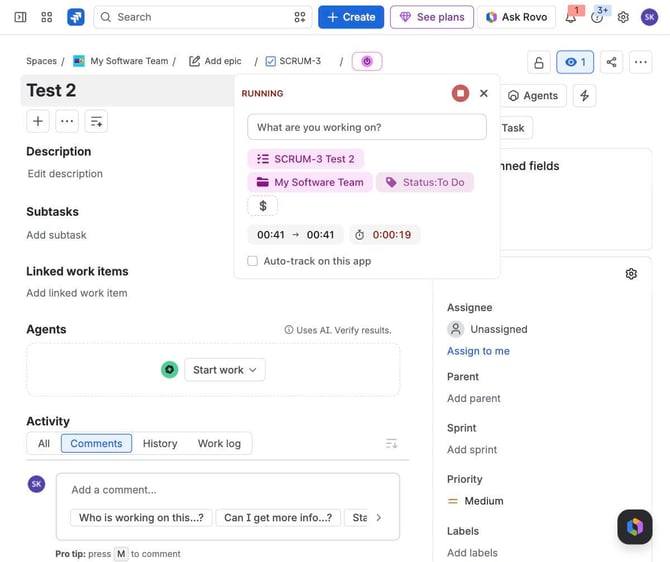
Nothing in that screenshot existed in Toggl beforehand. The task, the project and the tag were all created by the backend when the timer started.
Two ways to build one
| Option A — the Claude skill | Option B — the JSON editor | |
|---|---|---|
| Best for | Adding a button to a tool that has none | Changing what an existing button records |
| You need | Claude Code + the Claude in Chrome extension | Just your browser |
| Finding selectors | Claude inspects the page for you | You look them up in devtools |
| Effort | Describe what you want, answer a few questions | Edit JSON by hand |
They are not exclusive. The common path is: let the skill build the integration, then open the editor to fine-tune the mapping.
Option A — let Claude do it
This is the recommended starting point. See the full walkthrough in Create a Toggl Browser Integration (with Claude). The short version:
- Install the skill once:
npx skills add toggl/skills - Open the page you want the button on, signed in and in the right state.
- Ask Claude: "Create a Toggl browser integration on this page: <url>"
- Answer its questions — what to use as the title, whether you want extra metadata, one button or one per row.
- Right-click the Toggl toolbar icon → Open side panel on that same tab, and pick an organisation. Claude cannot click browser chrome, so this step is yours.
- Claude injects the button and verifies it, then you save.
⚠️ The skill predates the JSON editor, the field:value tag pattern and the Page data controls described below. It will happily map a title and a project; for the newer patterns, expect to finish the job in the editor. Worth updating the skill at some point.
Option B — the JSON editor
Right-click the Toggl toolbar icon → Open side panel. It opens with the definition for whatever site you are on, already filled in.
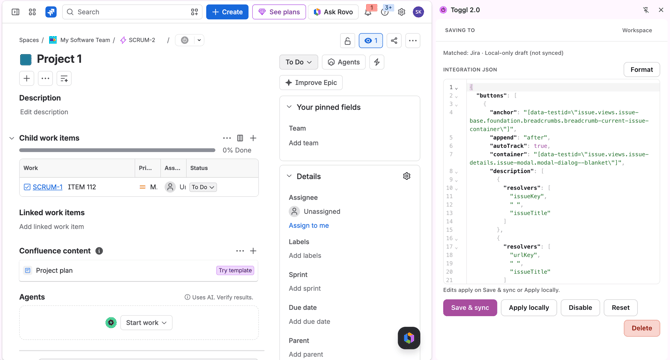
The buttons:
- Save & sync — saves to your organisation. Everyone in the org gets it.
- Apply locally — try it on your machine only. Survives a page refresh, syncs nowhere. Use this while experimenting.
- Disable — stop the button appearing on this site. Your changes are kept.
- Reset — throw away your edits.
- Delete — remove your organisation's version. A built-in one comes back if the site has one.
💡 Editing one of our built-in integrations does not change the built-in. The moment you save, your version is stored as a custom integration owned by your organisation, and it takes over for that site. Delete it and the original comes back.
It is stored as the difference from the built-in, so fixes we ship to the built-in still reach you. If the panel warns that it has to save a full copy (usually because the built-in buttons were reordered), they will not.
The editor checks your JSON as you type and refuses to save something malformed, so you cannot break an integration by mistyping.
The fields you can fill
| Field | Becomes |
|---|---|
description |
The task name, unless task overrides it. Despite the name, this does not fill the entry's own description — see note below |
task |
The task name, when it should differ from description |
project |
The project name. Matched exactly, so capitalisation matters |
tags |
Tag names — one entry can produce several. Duplicates are dropped and a start sends at most 10 |
note |
The time entry's own description — the "What are you working on?" text |
⛔️ A misleading name. description produces the task name, not the entry description — it has carried that name since before task resolution moved to the backend. If you want to set the text on the entry itself, that is note.
Giving the entry its own text — note
By default a time entry started from the button has no description of its own. The entry is identified by its task, which the row already shows beside it, so copying the task name into the description would just print the same string twice.
When someone types in the popover before starting, that text becomes the entry's description. note fills it when nobody types — useful when the entry should read differently from the task:
{
  "name": "jira-issue-detail",
  "description": { "resolvers": ["issueKey", " ", "issueTitle"] },
  "note": ["issueKey"]
}
The task stays SCRUM-3 Fix the bug, while every entry under it reads just SCRUM-3.
Precedence, most specific first:
- What the person typed in the popover — always wins.
- The definition's
notemapping. - Nothing. The entry keeps no description of its own.
note accepts exactly the same shapes as description, so all of these are valid:
"note": "issueKey"
"note": ["issueKey"]
"note": { "resolvers": ["issueKey", " — ", "issueTitle"] }
"note": [{ "resolvers": ["issueKey"] }, { "resolvers": ["urlKey"] }]
The last form is a fallback chain: the first one that produces text wins. A mapping that matches nothing sends nothing rather than blanking the entry.
🧭 One exception, handled for you. A start that ends up with no task at all — because nothing matched and tasks are set to Ignore or Attach existing — does get titled with the page text. That entry has nothing else to identify it, so the backend fills it in. You do not need to map anything for that case. With tasks on Ignore this is what every start does.
Where those values actually land
Everything you map is written to the task, not to the time entry. The entry stores only its own description, start, duration and billable flag, plus a link to the task — and it displays the task's project and tags by inheriting them.
| What you map | Stored on | Shown on the entry because |
|---|---|---|
description / task |
Task name | The entry links to the task |
project |
Task project | The entry's own project is left empty, so it falls through |
tags |
Task tags | The entry's tags are an override; left unset, they fall through |
note |
The entry itself | It is the one thing here that is not task state — which is also why it is the only mapping that updates on every start rather than once |
The one exception is a start with no task, which happens when tasks are on Ignore or nothing matched under Attach existing. Then the project and tags go straight onto the entry, and they are read fresh on every start.
⚠️ This is why mapped values are written once and never refreshed. They are task state, and the backend only writes them when it creates the task. Track a Jira issue, change its status, track it again — the tag still shows the old status, because the task already existed and nothing rewrote it. It applies to project, tags and custom fields alike, not just tags.
Where the values come from
A resolver is a named recipe for pulling one piece of text off the page. You write it once under resolvers and refer to it by name.
There are three kinds:
"issueTitle": { "root": true, "query": "h1[data-testid='summary']" }

"urlKey":     { "url": "path", "regex": "/browse/([A-Z]+-[0-9]+)" }

"dash":       { "literal": " — " }
The first reads an element from the page, the second parses the page's own URL, the third is fixed text. The page-reading kind takes a starting point (root, closest, parent) and a way to travel from it (query, previousSibling, nextSibling), plus optional regex / replace to trim the result.
field:value tags
The pattern people ask for most: a tag that carries a label and a value, like Status:To Do, Priority:Urgent or Language:english. It makes tags readable in reports instead of a soup of bare words.
🚨 The obvious way does not work, and fails silently. Writing ["Status:", "status"] produces two separate tags — Status: and To Do — because the tags field splits every part into its own tag. Adding join does not help; it is ignored for tags.
Build the label into the value with regex and replace instead.
The form that works, on a Jira issue:
"statusTag": {
  "root": true,
  "query": "[data-testid='issue-field-status.ui.status-view.status-button.status-button--text']",
  "regex": "^(.*)$",
  "replace": "Status:$1"
}
hen name it in the button: "tags": ["statusTag"]
Read "replace" as "whatever the regex captured, put it after Status:". $1 is the captured part. If the regex matches nothing, you simply get no tag — never a broken one.
Worked example — GitHub
One click on a GitHub issue, mapped to seven values from two different sources: the page itself and the URL.
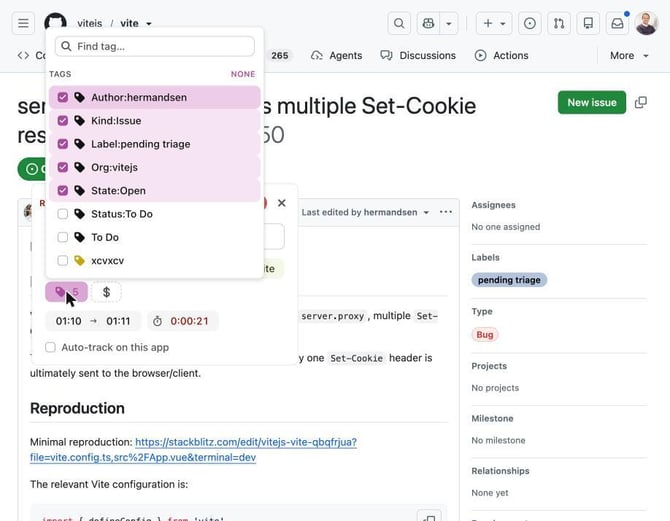
| Field | Source | Result |
|---|---|---|
| Project | URL path | vitejs/vite |
| Tag | Page — repeats per label | Label:pending triage |
| Tag | Page | State:Open |
| Tag | Page | Author:hermandsen |
| Tag | URL path | Org:vitejs |
| Tag | URL path | Kind:Issue |
"repoProject": { "url": "path", "regex": "^/([^/]+/[^/]+)", "replace": "$1" },
"labelTag":    { "closest": "@issue-viewer", "query": "div[data-testid='issue-labels'] span[class^='prc-Text-Text']", "regex": "^(.*)$", "replace": "Label:$1" },
"stateTag":    { "closest": "@issue-viewer", "query": "[data-testid='header-state']", "regex": "^(.*)$", "replace": "State:$1" },
"authorTag":   { "closest": "@issue-viewer", "query": "[data-testid='issue-body-header-author']", "regex": "^(.*)$", "replace": "Author:$1" },
"orgTag":      { "url": "path", "regex": "^/([^/]+)/", "replace": "Org:$1" },
"kindTag":     { "url": "path", "regex": "/issues/", "replace": "Kind:Issue" }
On the button: "project": ["repoProject"] and "tags": ["labelTag", "stateTag", "authorTag", "orgTag", "kindTag"]
Why the project-from-URL trick matters: time spent on any issue in a repository now rolls up to that repository automatically. Nobody has to create the project or remember to pick it.
Worked example — Zendesk
The same idea aimed at support, where the useful grouping is the customer rather than the repository.
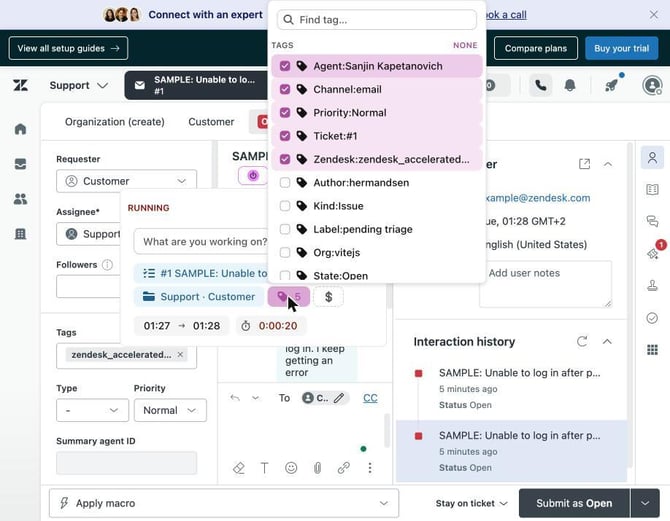
| Field | Source | Result |
|---|---|---|
| Project | Requester field | Support · Customer |
| Tag | Priority field | Priority:Normal |
| Tag | Assignee, group prefix stripped | Agent:Sanjin Kapetanovich |
| Tag | Via label, word "Via" stripped | Channel:email |
| Tag | Zendesk's own ticket tags | Zendesk:zendesk_accelerated_setup |
| Tag | An HTML attribute, not visible text | Ticket:#1 |
Every minute rolls up per customer on its own, then splits by priority, channel and agent. That is a billing report that configures itself.
The Page data controls
All of the above depends on what the extension is allowed to do with the names it reads off the page. That is set once for the whole organisation, at the top of the Integrations screen, with a separate setting for tasks, projects and tags.
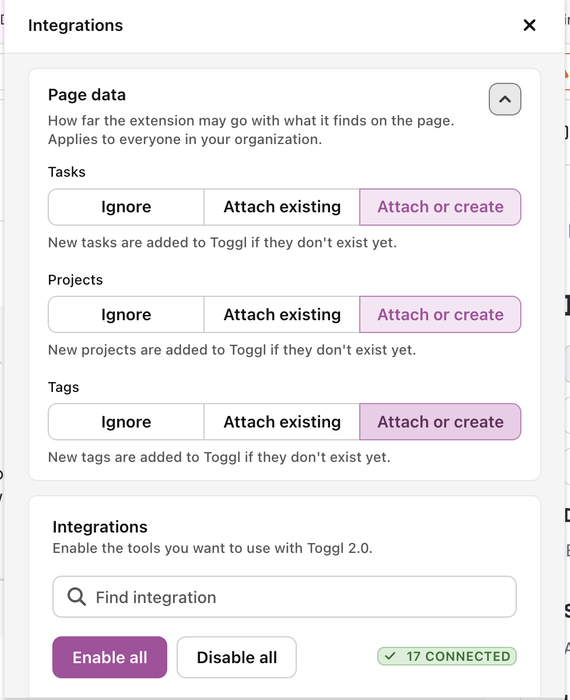
Each of the three has the same options:
| Option | What happens |
|---|---|
| Attach or create | The default. The extension matches what already exists in Toggl, and creates whatever is missing. |
| Attach existing | The extension only matches what already exists. Nothing new is created; a value with no match is skipped. |
| Ignore | The extension does not use the page value at all, even when it already exists in Toggl. With tasks on Ignore, every entry is titled with the page text instead, so it stays identifiable. With projects on Ignore, a task that is matched still keeps its own project. |
They are independent. An org can let tasks be created but only ever match existing projects, or ignore tags entirely while still filing everything under the right project. Whatever you pick, a start still records time. Worst case it arrives without that piece attached.
Only organisation admins can change these. If your carefully built mapping produces nothing, check them first.
The gotchas worth knowing up front
The full list, with symptoms and causes, is in Troubleshooting. These four catch almost everyone.
🏷️ Testing a new mapping on an item you already tracked shows nothing. Mapped values are attached when the backend creates the task. If the task already exists, nothing is created and nothing appears — the mapping looks broken when it is fine. True for tags, project and custom fields. Always test on an item that has never been tracked.
🔀 The tags field behaves differently from every other field. Other fields read their list as "use the first one that works" — a fallback chain. tags reads it as "use all of them". That is what you want for labels, and a surprise otherwise.
🗄️ Ignore the metadata block in older definitions. It looks like the field-mapping mechanism and is not. Only metadata.project is still read. Write new mappings as description, task, project and tags.
🧨 A malformed anchor selector takes down every button in the integration, not just one. This is why the editor validates selectors before letting you save — read that particular error carefully.
When nothing happens
The full checklist lives in Troubleshooting. The short version, in order:
- Did you reload the page after saving? The definition is read when the page loads.
- What are the Page data controls set to? See above. Anything on Ignore or Attach existing will never be created.
- Have you tracked this item before? See the first gotcha.
- Does the selector actually match? Open devtools, run
document.querySelectorAll('your-selector')in the console, and confirm it finds exactly one element on the page you are testing. - Check what the button resolved. While the side panel is open, the button writes its results onto the page as HTML attributes — inspect the Toggl button and look for
data-toggl-debug-project,data-toggl-debug-tagsanddata-toggl-debug-resolvers. Each resolver reportsmatched: trueorfalse, which usually points straight at the broken one.data-toggl-debug-issueslists what the definition itself got wrong: a misspelled resolver name, an unknown@alias, an invalid regex. Close the side panel and the attributes disappear.
⏱️ One caveat on step 5: those attributes are written when the button first appears. On slow apps like Zendesk, where side panels load after the button, they can be stale and under-report. The popover you get when you actually start a timer is the source of truth.
Troubleshooting
1. Did you reload the page?
The definition is read when the page loads. Saving in the side panel does not change a page that is already open.
2. What are the Page data controls set to?
At the top of the Integrations screen, tasks, projects and tags each have their own setting: Attach or create, Attach existing or Ignore. Anything not on Attach or create is never created, and anything on Ignore is not used at all, even when it already exists in Toggl. A start still records time, it just arrives without that piece attached. Only organisation admins can change these.
3. Have you tracked this item before?
Everything you map — project, tags, custom fields — is stored on the task, and the backend writes it only when it creates that task. The time entry holds just its own description, start, duration and billable flag, and inherits the rest from the task it links to.
🏷️ So a second track of the same item changes nothing. Test a new mapping on an item you have already tracked and the task already exists, nothing is created, and no value appears — the mapping looks broken when it is fine. It also means a value that changes upstream (a Jira status moving on) is never refreshed on the task. Always test on an item that has never been tracked.
4. Does the selector actually match?
Open devtools on the page you are testing and run:
document.querySelectorAll('your-selector-here') You want exactly one element for a single value, or the expected number for a multi-value tag. Zero means the selector is wrong or the page has not finished loading.
5. Ask the button what it resolved
While the side panel is open, the Toggl button writes its own results onto the page as HTML attributes. Close the panel and they disappear, so open it first. Inspect the button and look for:
| Attribute | Shows |
|---|---|
data-toggl-debug-description |
The description it would send |
data-toggl-debug-project |
The project name |
data-toggl-debug-tags |
The tag list |
data-toggl-debug-resolvers |
Every resolver, each with matched: true or false |
data-toggl-debug-issues |
What the definition itself got wrong: a misspelled resolver name, an unknown @alias, an invalid regex, two starting points in one resolver |
The resolvers attribute usually points straight at the broken one.
⏱️ These attributes can lie. They are written when the button first appears. On apps that load their side panels after the button — Zendesk does exactly this — they under-report, showing two tags when a real start produces five.
The popover you get when you actually start a timer is the source of truth. If the attributes look wrong, start a timer before concluding anything.
Symptoms and causes
| What you see | Usual cause |
|---|---|
A tag with a literal resolver name in it, like titel |
Misspelled resolver name — unknown names become literal text. data-toggl-debug-issues names it |
Two tags where you wanted one field:value tag |
Literal parts under tags; use regex • replace instead |
| Every button on a list shows the same value | root where the resolver should use closest scoped to the row |
| A fallback chain never reaches its second option | The first option is a typo that resolved to literal text |
| No buttons at all, anywhere on the site | A malformed anchor selector — it takes down the whole integration, not one button |
| Project chip empty but tags fine | Projects set to Ignore in the Page data controls, or the name does not match exactly — check capitalisation and stray whitespace |