---
title: Setting up and managing single sign-on (SSO)
description: Configure SAML2 single sign-on for your Toggl 2.0 organization — setup, review, and ongoing admin controls in one place.
---
[Skip to content](https://docs.toggl.com/setting-up-and-managing-single-sign-on-sso#main-content)
English
Show submenu for translations
[](https://docs.toggl.com/?hsLang=en)
Open main navigation
Close main navigation
- English
Show submenu for translations
- [Go to Toggl](https://focus.toggl.com/)
[Go to Toggl](https://focus.toggl.com/)
How can we help you?
- There are no suggestions because the search field is empty.
1. [Toggl 2.0 Knowledge Base](https://docs.toggl.com/?hsLang=en)
2. [Admin Settings & Security](https://docs.toggl.com/admin-settings-security?hsLang=en)
3. [Single Sign-on](https://docs.toggl.com/admin-settings-security?hsLang=en#single-sign-on)
# Setting up and managing single sign-on (SSO)
## One login, one set of credentials — configure SSO once and manage everything from the same place afterward.
Single sign-on (SSO) authenticates your team through your existing identity provider (IdP) instead of a separate Toggl password. It works with any IdP that supports SAML2 — Okta, Google Workspace, Microsoft Entra ID, OneLogin, and others.
SSO is available on the Premium and Enterprise plans.
#### Why teams turn SSO on
**Security**
- With SSO enforced, Toggl access runs entirely through your identity provider — no standalone password to leak, and anyone your IdP no longer recognizes loses access automatically.
- New accounts can't be self-created under a domain that's already SSO-enabled; people only join when an admin invites them.
- Activity logs cover the last three months, so you've got a trail to work from if login issues come up.
**Less to manage day to day**
- Nobody needs a separate password for Toggl — it's the same credentials they already use elsewhere.
- One domain can cover several workspaces at once (an admin still has to invite each person individually).
- More than one admin can share responsibility for the SSO profile, so it's never resting on a single person.
- New users can be created automatically the moment they first log in via SSO, instead of an admin adding them by hand.
#### How it fits together
1. An Organization Admin builds an SSO profile for the team's domain, using details from their identity provider.
2. Toggl's team reviews it to confirm the domain and admin status check out.
3. Once approved, anyone on that domain sees a **Company login (SSO)** option, and profile admins can turn on the extra controls covered later in this guide.
#### Building your SSO profile
You'll need Organization Admin access, and Toggl needs to be reasonably confident you own the domain you're registering.
**Step 1 — Find the SSO section**
Go to Admin settings → Organization → Single sign-on.
**Step 2 — Start a new profile**
Click New SSO profile, then fill in the sections below:
``
- **SSO profile name and Email domain** — a name for the profile (useful once you have more than one) and the domain your team logs in with (e.g., `organization.com` for `jane@organization.com`). 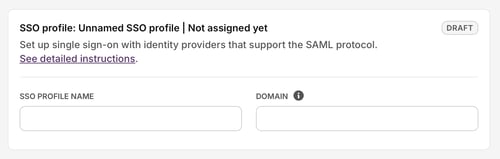
- **Integration details** — copy these values into your IdP's own setup page. Two things to get right on the IdP side: set the Unique User Identifier to the **user's email**, and set the SAML signing option to **Sign SAML response**. 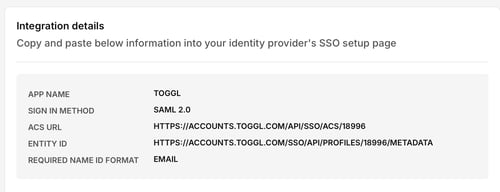
Need provider-specific steps? See: [Setting up SSO for Okta](https://docs.toggl.com/setting-up-sso-for-okta?hsLang=en) · [Setting up SSO for Google Workspace](https://docs.toggl.com/setting-up-sso-for-google-workspace?hsLang=en) · [Setting up SSO for Entra ID](https://docs.toggl.com/setting-up-sso-for-entra-id?hsLang=en) · [Setting up SSO for OneLogin](https://docs.toggl.com/setting-up-sso-for-onelogin?hsLang=en) **Note:** If your users should start the login flow from your side rather than from `accounts.toggl.com` (Identity Provider–initiated login), append `?toggl_product=focus` to the **ACS URL**.
- **Identity provider information** — pull these from your IdP. Either paste a metadata URL, or fill in the sign-in URL, entity ID, and X.509 certificate individually. Using more than one IdP for the same domain? Add another configuration and name each one clearly, since users will choose between them at login. 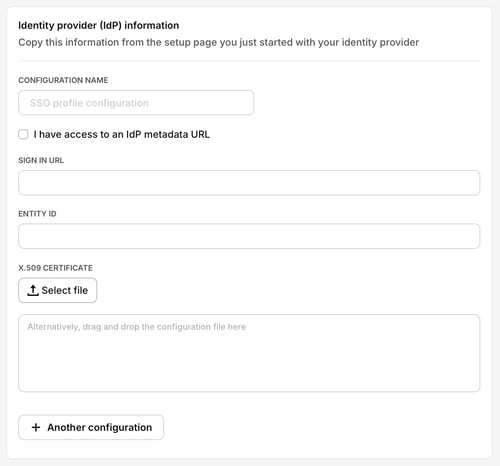``
- **Profile settings** — Require SSO for sign-in, Block new organizations, and Add additional administrators. You can turn these on once the profile has been approved.
**Step 3 — Submit**
Click Submit for review. You can also click Create profile to save a draft, then submit it later from the profile list.
#### What happens during review
Toggl checks two things: that you're an Organization Admin on a plan that includes SSO, and that you have a legitimate claim to the domain. This usually takes under two business days, and you'll get an email either way:
- **Approved** — the profile goes live. Test your login, connect it to a workspace for auto-creation (below), or adjust the settings in the next section.
- **Not approved** — it reverts to Draft with a reason listed on the page. Fix it and resubmit any time.
#### Managing an approved profile
Once live, go to Admin settings → Organization → Single sign-on, click Edit on the profile, and adjust any of the following:``
**Enforce SSO-only login**
Restricts that domain to SSO exclusively — no email/password, Google, or Apple login. New signups from that domain also get blocked outside of an admin invite. You can whitelist specific people to bypass this; profile admins are whitelisted automatically.
**Add additional admins**
Gives other team members full control over the profile — editing, enabling, disabling, or assigning it to workspaces. Anyone you add is whitelisted like the original creator, and can also remove other admins, including you.
**Logs**
Logs Open the profile’s Logs — a record of everything that's happened on this profile over the last three months. Useful first stop when troubleshooting a login issue.``
**Automatic user creation**
Off by default. When turned on for a workspace, anyone logging in via SSO for the first time gets a Toggl account created automatically and added to that workspace — no manual invite needed.
A few things worth knowing before you turn this on:
- It only creates accounts — it won't remove anyone automatically.
- It only fires on SSO logins; someone trying another method won't get an account made for them this way.
- Since it can grow your team size, it may affect your subscription cost.
To enable it, you'll need to be an admin of both the SSO profile and the organization the workspace belongs to:
1. Go to Admin settings → Organization → Single sign-on and open the profile.
2. Open Workspaces and turn the profile on for each workspace that should auto-create accounts.
3. New users are added automatically on their next SSO login.
Only Toggl 2.0 workspaces are listed here. Workspaces in other Toggl products are managed in the Admin Console.
#### Updating a certificate
If your IdP's certificate expires or rotates, you don't need to rebuild the profile:
- **Metadata URL configured?** Just make sure the current URL is entered — Toggl pulls the updated sign-in URL, entity ID, and certificate automatically.
- **No metadata URL?** Click Edit on the profile, uncheck **Use metadata URL** if needed, and upload or paste the new certificate.``
No **Edit** option showing? You'll need Organization Admin permissions.
#### Adding more domains
Need SSO on another domain? Click New SSO profile and repeat the setup — your SSO profiles page will list all of them together.
- [Getting started](https://docs.toggl.com/getting-started?hsLang=en#main-content)
- [Start here](https://docs.toggl.com/getting-started?hsLang=en#start-here)
- [Quickstart Guides](https://docs.toggl.com/getting-started?hsLang=en#quickstart-guides)
- [Set up your Workspace](https://docs.toggl.com/getting-started?hsLang=en#set-up-your-workspace)
- [Toggl Guides for Toggl Track and Toggl Plan users](https://docs.toggl.com/getting-started?hsLang=en#toggl-guides-for-toggl-track-and-toggl-plan-users)
- [Using Toggl, page by page](https://docs.toggl.com/using-toggl-page-by-page?hsLang=en#main-content)
- [Timer](https://docs.toggl.com/using-toggl-page-by-page?hsLang=en#timer)
- [Reports](https://docs.toggl.com/using-toggl-page-by-page?hsLang=en#reports)
- [Projects](https://docs.toggl.com/using-toggl-page-by-page?hsLang=en#projects)
- [Tasks](https://docs.toggl.com/using-toggl-page-by-page?hsLang=en#tasks)
- [Timeline](https://docs.toggl.com/using-toggl-page-by-page?hsLang=en#timeline)
- [Members](https://docs.toggl.com/using-toggl-page-by-page?hsLang=en#members)
- [Approvals](https://docs.toggl.com/using-toggl-page-by-page?hsLang=en#approvals)
- [Time Off](https://docs.toggl.com/using-toggl-page-by-page?hsLang=en#time-off)
- [Profile Settings](https://docs.toggl.com/using-toggl-page-by-page?hsLang=en#profile-settings)
- [Admin Settings & Security](https://docs.toggl.com/admin-settings-security?hsLang=en#main-content)
- [Workspace Setup](https://docs.toggl.com/admin-settings-security?hsLang=en#workspace-setup)
- [Tracking & Rates](https://docs.toggl.com/admin-settings-security?hsLang=en#tracking-rates)
- [Single Sign-on](https://docs.toggl.com/admin-settings-security?hsLang=en#single-sign-on)
- [Subscription & Billing](https://docs.toggl.com/subscription-billing?hsLang=en)
- [Toggl Apps](https://docs.toggl.com/toggl-apps?hsLang=en#main-content)
- [Mobile](https://docs.toggl.com/toggl-apps?hsLang=en#mobile)
- [Desktop](https://docs.toggl.com/toggl-apps?hsLang=en#desktop)
- [Browser Extension](https://docs.toggl.com/toggl-apps?hsLang=en#browser-extension)
- [API & Integrations](https://docs.toggl.com/api-integrations?hsLang=en)
- [Troubleshooting & FAQs](https://docs.toggl.com/troubleshooting-faqs?hsLang=en#main-content)
- [My Toggl Acount](https://docs.toggl.com/troubleshooting-faqs?hsLang=en#my-toggl-acount)
- [Common Questions](https://docs.toggl.com/troubleshooting-faqs?hsLang=en#common-questions)
Copyright © 2026. Toggl. [Privacy Policy](https://toggl.com/legal/focus/privacy/)